SOP: Creating a SendGrid Account
Purpose:
To create and verify a SendGrid account for sending transactional and marketing emails.
Who This Is For:
Team members responsible for email setup, integrations, or onboarding new tools.
Time Required:
10–15 minutes
✅ Prerequisites
A valid business email address (recommended: not Gmail/Yahoo)
Access to the domain you’ll be sending emails from (for later DNS verification)
Company name and website URL
Step 1: Go to SendGrid Sign-Up Page
Open your browser
Navigate to sendgrid.com
Click “Start for Free” or “Sign Up”


Step 2: Create Your Account
Fill out the form with the following:
Email Address
Password
Company Name
Then:
Check the I’m not a robot box
Click Create Account
? Use a strong password and a shared team email if applicable.

Step 3: Verify Your Email Address
Check your inbox for a SendGrid email
Click Verify Email Address
You’ll be redirected back to SendGrid
⚠️ You cannot send emails until this step is completed.
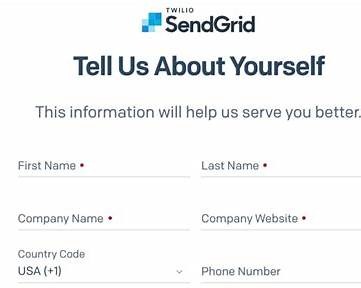
Step 4: Answer Account Setup Questions
SendGrid will ask a few onboarding questions:
What will you use SendGrid for? (Transactional / Marketing)
Approximate monthly email volume
Industry
Website URL
Answer honestly → click Continue


Step 5: Add Sender Identity (Required)
Go to Settings → Sender Authentication
Click Create New Sender
Fill in:
From Name
From Email
Company Address
Save
? This controls what recipients see in their inbox.
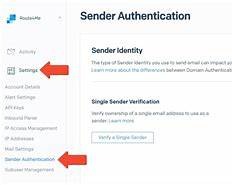

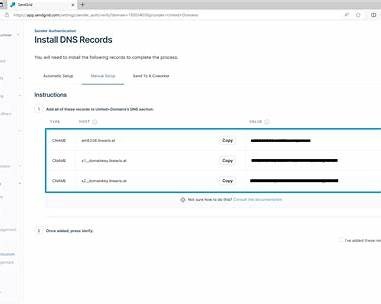
Step 6: (Optional but Recommended) Authenticate Your Domain
⚠️ This step improves deliverability and prevents spam issues.
In Sender Authentication
Click Authenticate Your Domain
Choose your DNS host (GoDaddy, Cloudflare, etc.)
Copy DNS records into your domain provider
Click Verify
? This may take a few minutes to propagate.

Step 7: Confirm Account Is Ready
You should now have access to:
Dashboard
API Keys
Email Activity
Suppressions
✅ Your SendGrid account is officially ready to use.


✅ Completion Checklist
Account created
Email verified
Sender identity added
Domain authenticated (recommended)
Dashboard access confirmed
? Notes for Internal Use
Free tier allows 100 emails/day
- API keys should be stored securely
Do not share login credentials in plain text
Was this article helpful?
That’s Great!
Thank you for your feedback
Sorry! We couldn't be helpful
Thank you for your feedback
Feedback sent
We appreciate your effort and will try to fix the article