SOP: Domain Verification in SendGrid
Purpose:
To authenticate a sending domain in SendGrid to improve email deliverability and prevent emails from being marked as spam.
Who This Is For:
Team members responsible for email setup, DNS management, or SendGrid configuration.
Time Required:
10–20 minutes (DNS propagation may take longer)
✅ Prerequisites
Active SendGrid account
Access to domain DNS settings (GoDaddy, Cloudflare, Namecheap, etc.)
Domain you will send emails from (example: yourdomain.com)
Step 1: Open Domain Authentication in SendGrid
Log in to SendGrid
Navigate to Settings → Sender Authentication
Under Domain Authentication, click Authenticate Your Domain


Step 2: Select Your DNS Provider
Choose your DNS host from the list
(GoDaddy, Cloudflare, Namecheap, Other)
Select Yes or No for automated security
Recommended: Yes
Click Next
? Choosing “Other” is fine if your provider isn’t listed.


Step 3: Enter Your Sending Domain
Enter the domain you’ll send from
Example: example.com
Click Next
⚠️ Do not include https:// or www.


Step 4: Copy DNS Records from SendGrid
SendGrid will generate CNAME records (usually 3–5).
You will see:
Host / Name
Type (CNAME)
Value / Points To
? Do not modify these values.
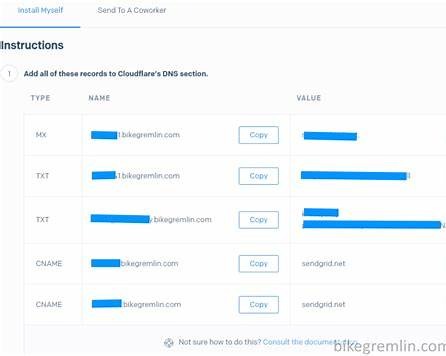

Step 5: Add DNS Records to Your Domain Host
Open your DNS provider in a new tab
Go to DNS Management
Add each CNAME record exactly as shown:
Type: CNAME
Host/Name: (from SendGrid)
Value: (from SendGrid)
TTL: Default or Auto
Save changes
⚠️ Remove the domain portion if your provider auto-appends it.


Step 6: Verify Domain in SendGrid
Return to SendGrid
Click Verify
Wait for confirmation
⏳ Verification can take:
Instant → 5 minutes
Up to 24 hours (rare)


Step 7: Confirm Domain Authentication Status
Once verified:
Status shows Authenticated
DKIM and SPF are active
Domain is safe for sending
✅ No further action needed.


❗ Common Issues & Fixes
❌ Verification Failed
Double-check CNAME values
Remove duplicate records
Wait 15–30 minutes and retry
❌ Hostname Error
Remove yourdomain.com from the Host field if auto-added
❌ Still Pending
DNS provider may be slow → wait up to 24 hours
✅ Completion Checklist
Domain entered correctly
All CNAME records added
Domain shows Authenticated
Test email successfully sent
? Internal Best Practices
Use one sending subdomain (ex: mail.yourdomain.com)
Authenticate every domain used in SendGrid
Document DNS changes internally
Was this article helpful?
That’s Great!
Thank you for your feedback
Sorry! We couldn't be helpful
Thank you for your feedback
Feedback sent
We appreciate your effort and will try to fix the article